Wednesday, March 18, 2009

A Sneak Peek


The other night, I could not sleep… So instead of staring at the ceiling, I decided to do something useful.  I downloaded Google’s Sketchup and very quickly taught myself how to model in 3D, and this is the result.

Photobucket

Photobucket

Photobucket

Photobucket

The dimensions are not perfect, but to within a few inches this is what our kitchen will basically look like in the upper unit.

Monday, March 16, 2009

The Final Demolition

Well that's it!
We have come to a turning point in the first part of our renovations.

This past weekend we rapped up all the major demolition for the upstairs unit by cutting in the rough opening for a new door. From this point forward its reassembly! And yes, I cannot wait until I can make myself a cup of Coffee in the morning.

Anyways, here are some pictures of the new door.... enjoy.

Photobucket

Photobucket

Photobucket

Photobucket

Photobucket

Photobucket

Photobucket

Photobucket

Photobucket

Photobucket

Making our Nights a Little Brighter


Sice we took down all the plaster on the ceiling… we decided it would be nice to add a some recessed lighting to the kitchen. 

We added 4 can lights over where the counters and sink should be.


Photobucket


Photobucket


Photobucket


Photobucket

Sunday, March 15, 2009

Not So Cold Any More

Well, this was a terrific weekend. We got lots done and are just inches away from starting to put everything back together.
One of the big projects we accomplished this weekend was removing the window pictured in the last post.

We removed the window to get a few extra wall cabinets in order to help with the lack of storage this place has. And don't worry about the loss of light... when we took out the walls, we opened the kitchen up to 4 new windows... so our entire house will be brighter than ever.

Anyways... enjoy the pictures
Photobucket

Photobucket

Photobucket

Photobucket

Photobucket

Photobucket

Friday, March 13, 2009

I'm In for a Cold Night

This is all in preparation for our final push this weekend to start to reassemble the kitchen.

Photobucket

So look back for some exciting new updates.....

Thursday, March 12, 2009

Back to the Kitchen... Again


Now that the chimney walls have been taken out, we went ahead and added a cold water line that will be used for an Ice maker in a freezer.

We then filled the hole in the floor and framed out the wall to make it perfectly level.

Photobucket


Once we finished framing the wall, we demolished the built in pantry.

Photobucket


Since the ceiling plaster had lots of cracks, and was incredibly uneven, we decided that we would take down all the plaster and put up fresh sheet rock….

This is the mess that resulted from that decisions

Photobucket

Photobucket

Photobucket

Photobucket

Photobucket

Photobucket

Tuesday, March 10, 2009

The Belly of the Beast

If you go back to my original post on this blog, I state that we will be adding a garage.  I have not given any updates on this because it is a fairly complicated situation.

Sparing you the nitty-gritty details, I am going to do my best to explain where we are in the process.


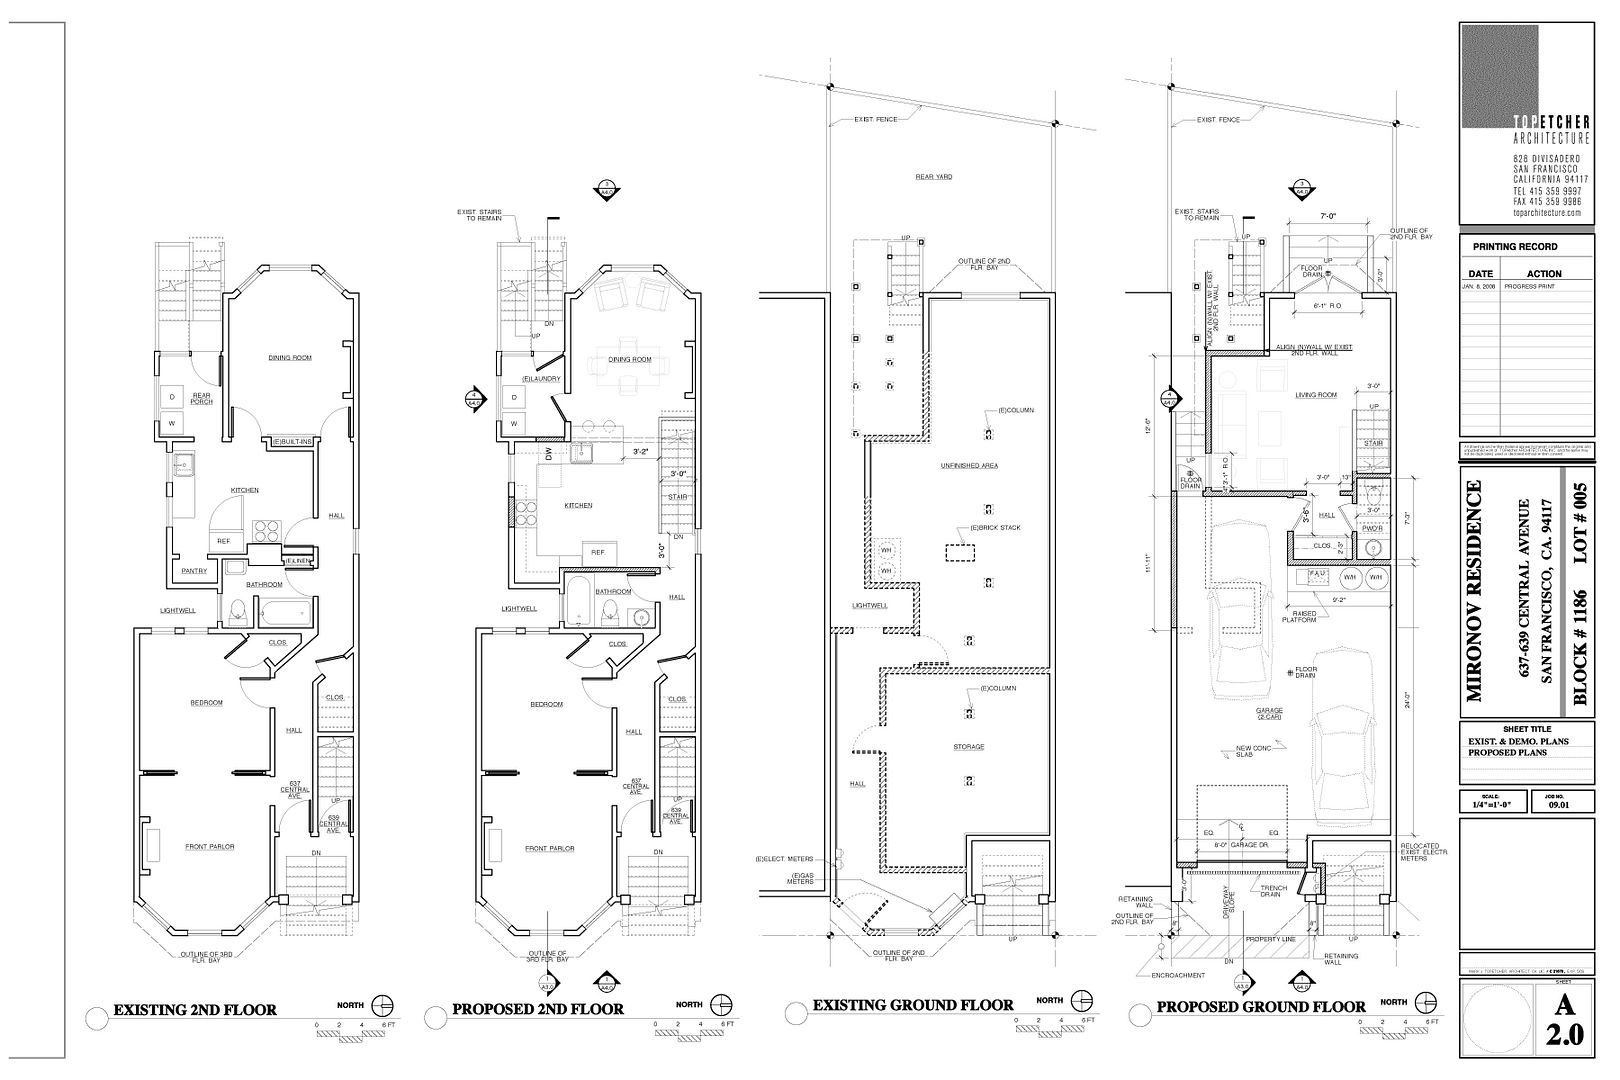
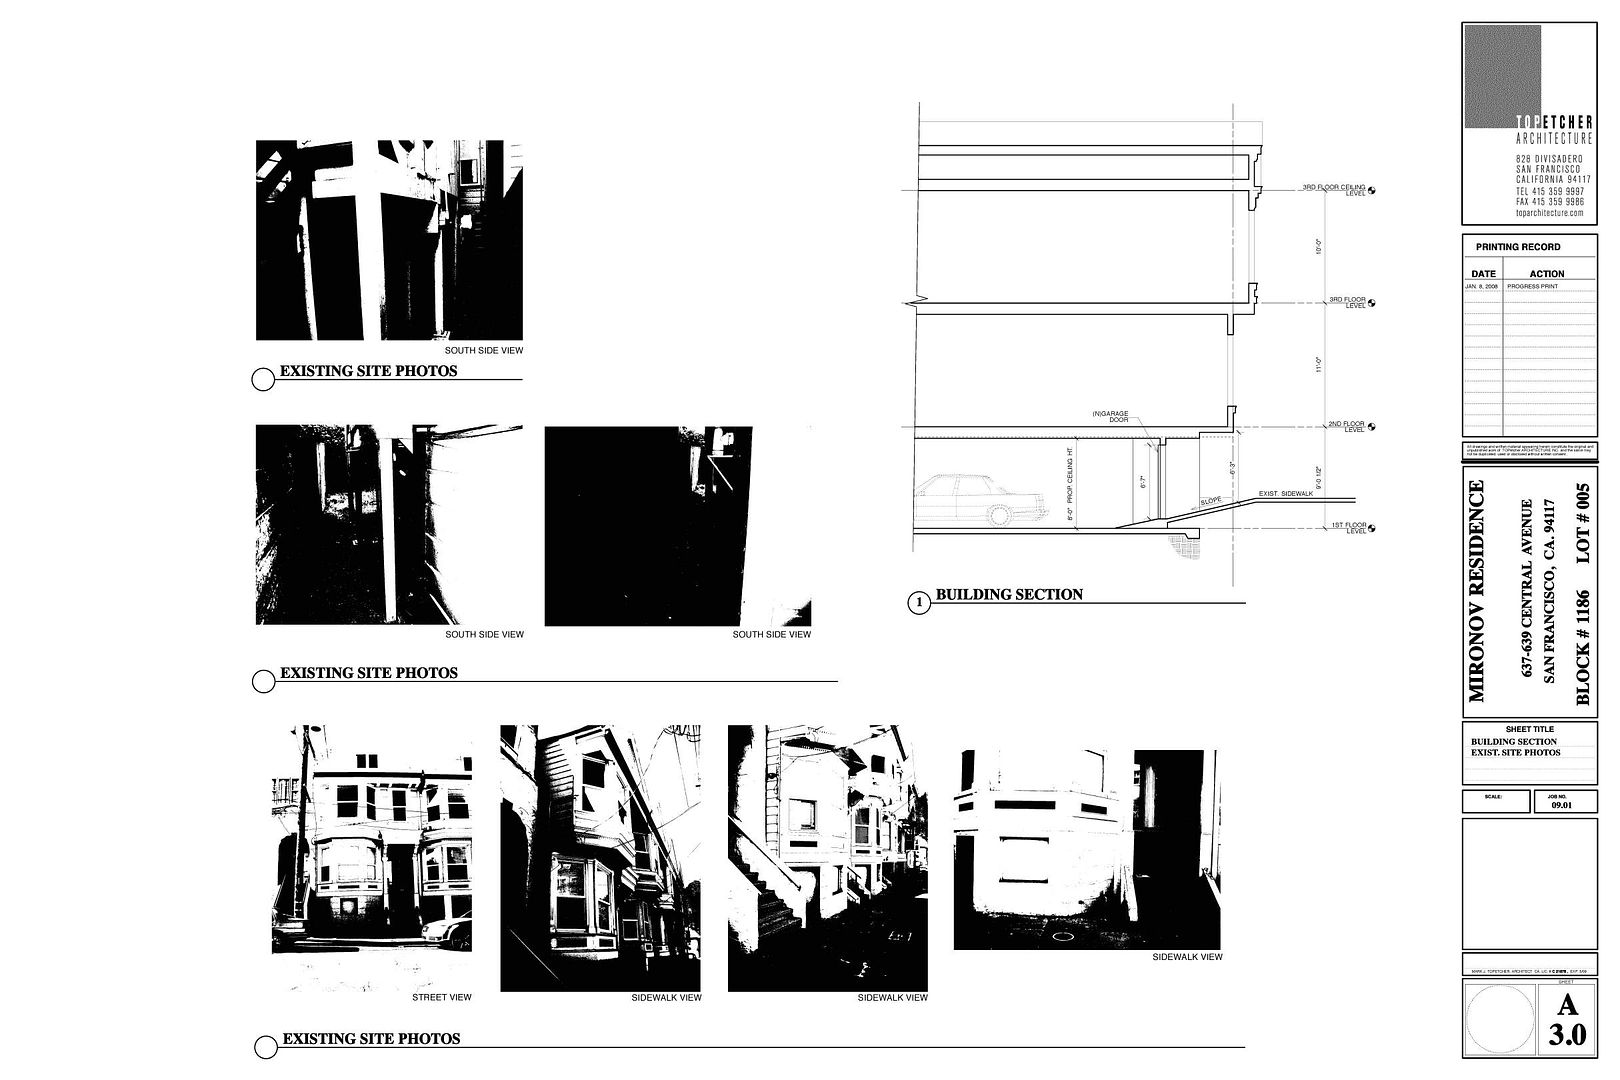
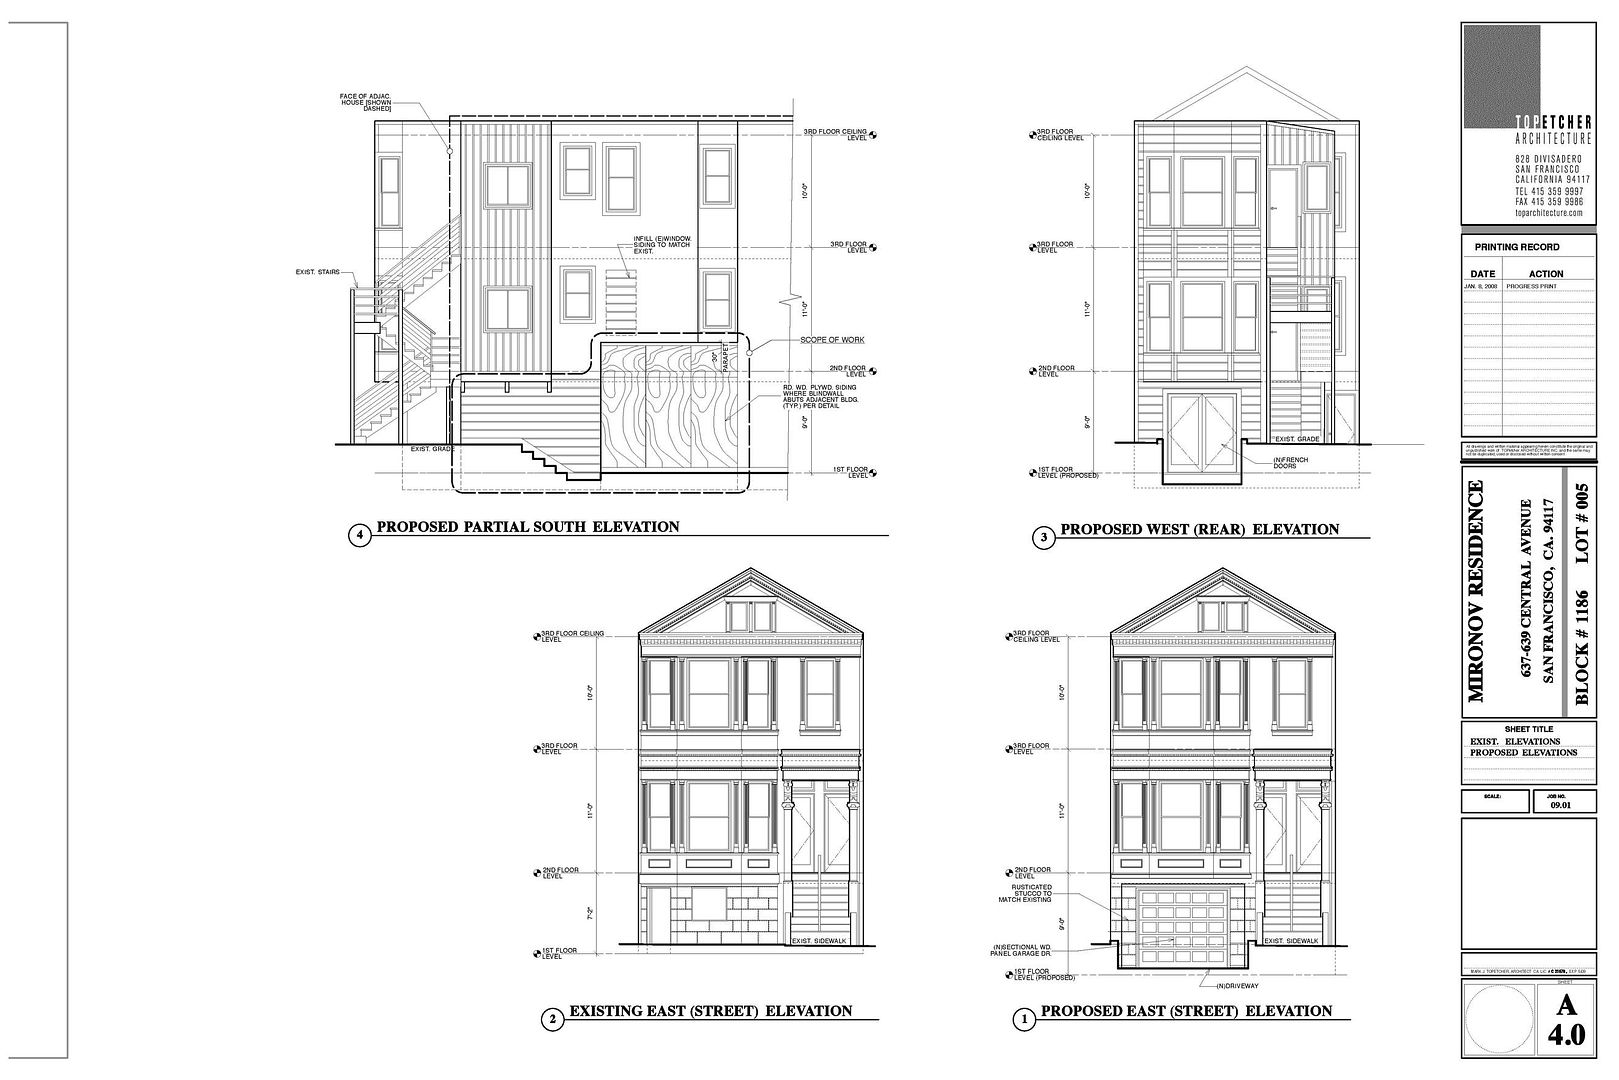
The first step was to get an architect to design the space.  Below are the plans that were produced. 

Right Click, then click “Save Image As,” save it to your desktop so you can more easily view it. 


Scroll to the right to see more of the drawing>>>>>>>>>>>>>>>>>>>>>>>>>>>>

Photobucket

Photobucket

Photobucket

Photobucket


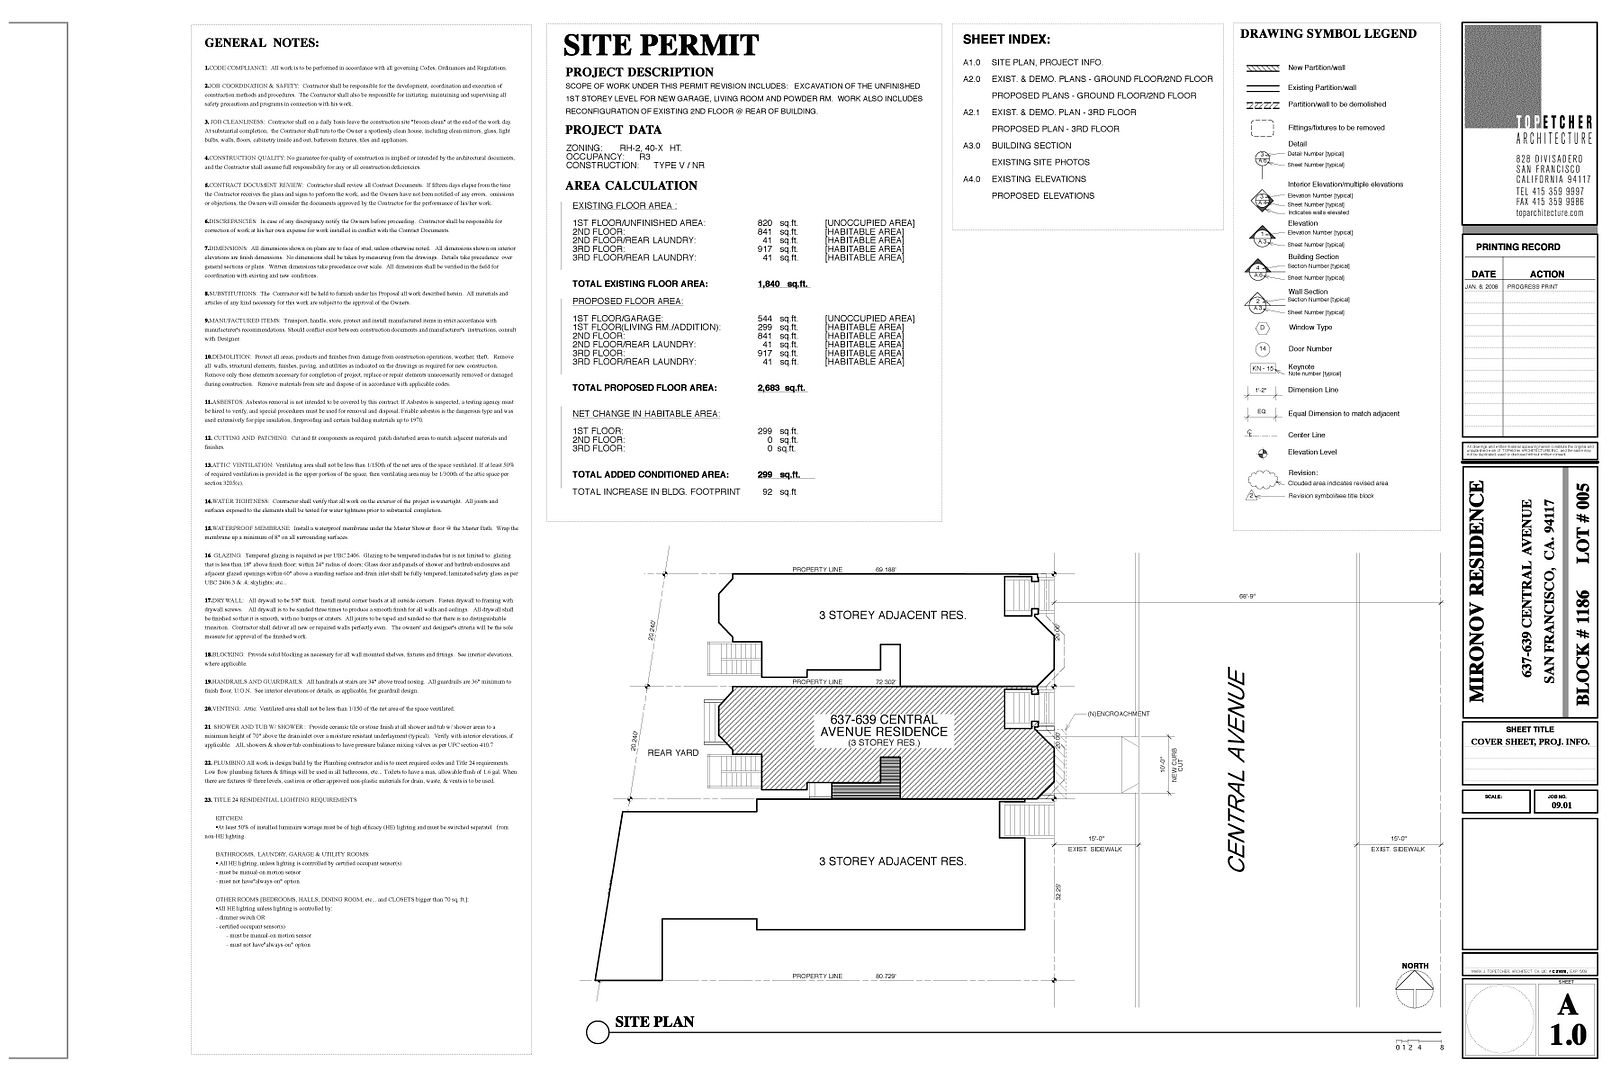
Once the plans were set, we submitted them to the city to get the permits.  This was back on January 9th of this year.  After two months, we got the approval from the city with a few stipulations.  One of the stipulations is that the house is to pass an “Environmental Review.”  Basically, the property is put through this review to ensure that is does not have any historical significance.

So, Alec is going to spend the entire weekend in the SF main library to pull out every record of every person who has lived, work, or had anything to do with our house.

Once we have this info, we will submit it to the city, and hopefully within another month we can have the permits in hand.

Monday, March 9, 2009

Back to the Kitchen


Now that we have successfully removed the two walls, it was time to start working on the other side of the kitchen.


First we rebuild a little wing wall that will cover the fridge so you can’t see it from the hall.

Photobucket


Next we demolished the chimney opening and all the plaster and lath on the back wall

Photobucket


Photobucket


Photobucket


Photobucket


We then spent a good deal of time moving the gas pipe from the bottom left of this picture

Photobucket


To the top right of this picture (it’s the shiny thing you can kind of make out)

Photobucket


Much more to come… stay tuned…………………………..

Thursday, March 5, 2009

The Attic


Let’s take a little break from all this Kitchen remolding.

I think we should move up another 10 feet, but you better bring some plywood… you’re going to need it.


Step 1:

Examine the Hole

Photobucket


Step 2:

Examine the hole closer

Photobucket


Step 3:

Count your blessings that you still have all your fingers after removing a bracket with a giant sprint attached to it.


Step 4:

Struggle to fit a 4’x8’ piece of plywood through a 4’1/4”x 8’1/4” diagonal opening while an unhelpful cameraman snaps photos

Photobucket


Step 5: Continue to struggle to fit large piece of wood through the slightly larger hole

Photobucket


Step 6: Repeat step 5


Photobucket


Step 7: Repeat step 6

Photobucket


Step 8: Repeat step 5

Photobucket


Step 9: Repeat step 6

Photobucket


Step 10: Repeat step 7

Photobucket


Step 10: Repeat step 8

Photobucket


Step 11: Repeat step 9

Photobucket


Step 12:  Repeat steps 4 to 11 another 15 times


Step 13: Begin to make yourself a new floor

Photobucket


Photobucket

Followers

Contributors